
So you want to know how to make your own Wedding Monogram? I realized that this process is somewhat important when trying to DIY your wedding and cut costs as much as you can.
First things first, I haven't printed off my own wedding monogram yet because my printer is acting up. Secondly I can't wait to see how this looks on paper. Thirdly, remember this is your own monogram your designing so feel free to view my monogram and repeat my steps, but design your monogram to your liking. (Note: Its customary to have the brides name/initial first in the wedding monogram, but honestly who cares if the mans name/initial goes first. I want my future husbands name/initial to come first, so mine will be changed.) Have fun with this process, and don't rush it.
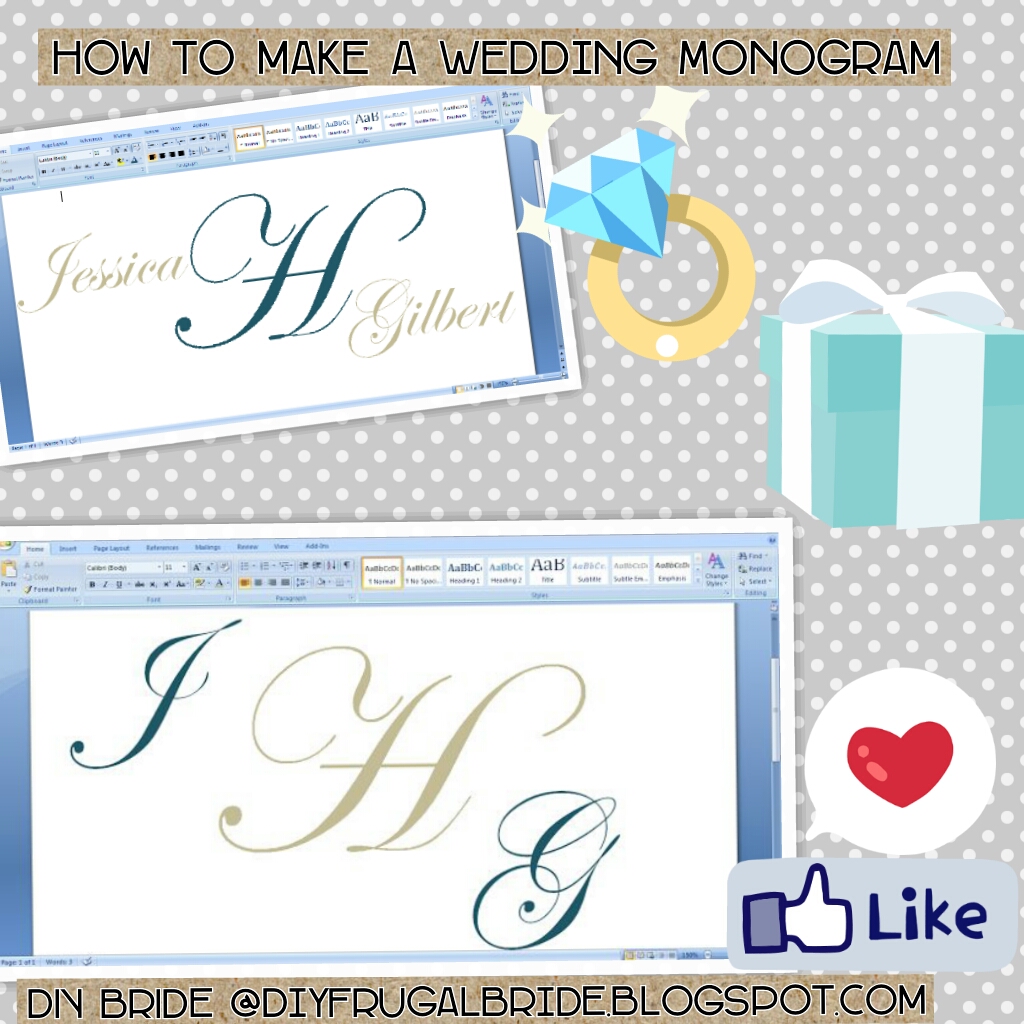
1. Draw a big text box for the last name initial. You want to make sure that the text box is big enough because the last name initial is customarily bigger than the rest of the name/initials.

2. Type in the initial or last name which ever you want in the text box. Once you've typed in your initial you can begin playing around with your design. Highlight the letter/name and change the font, size, color etc. Experiment as much as you can because this is your main focus of the monogram. (Remember to stay with your wedding colors, or close to your wedding colors.) The size of my initial is 250, but of course if its a name you want to cu it down to 150-175. The initial should be higher than 200. The text I decided to use is called Edwardian Script.

3. Insert two other text boxes for you and your fiances initials/names. Repeat step 2 with playing around with font, size, color, etc. My size for my two initials are 150. When I use names I cut it down to 100 each name.


4. Once you've typed in all the desired initials/names, you can begin to work on getting rid of the border around each text box. I know you've noticed it, because each initial can't be arranged with these border lines in the way.
Right click on the text box (you have to repeat this step for each text box you've made) and select "format text box".

The format text box will pop up, then go to the first option fill, and select " no color".
Next, go to the second option which is the line and select "no color" again.

This will get rid of the border line around your initial/name text box.


 Final Note: I didn't use pacific colors in my monogram examples because I found it makes a better example being black so you can see and understand everything. You can go back and change your monogram to the colors you prefer. I hope this helps you with making and designing your own wedding monograms. Please feel free to leave me back any questions you may have, or positive feedback. I am always happy to help! Please follow my blog, I don't have many followers, and I would love to get to know who is interested in my blog!

Views: 501
Write a Review or Comment
© 2024 Created by Christine Dyer.
Powered by
![]()

You need to be a member of BridalTweet Wedding Forum & Vendor Directory to add comments!
Join BridalTweet Wedding Forum & Vendor Directory