
I know I haven't made any wedding DIY projects for my wedding in a while! Here is the post, and I love the idea of asking my closest girls to be a bridesmaid in this cute way. This idea originated from the handy dandy Pinterest. lol First things first...I was up in the air on what color to choose, and if I should make my MOH (Made of Honor) card a different color. Then I got to thinking...girls. Oh girls are competitive and hold onto grudges forever! So I don't think I will have to name a specific MOH. Anyone have any advice on this subject, because I'm between my best friend and my older sister. The thing is, my best friend won't be able to help me out with the wedding as much because she has twin 1 yr. old daughters. My older sister, is busy working but I think she'll help when she can. My little sister is going to be a bridesmaid but she doesn't drive. So I'm kind of in a stand still on the idea of a specific MOH.
First thing, let's discuss the supplies you need for this project. Most of the supplies I already had handy in my craft room, so I really only bought the glue, ribbon, and rhinestones.
Before we move on the actual project I must tell you that this is a time consuming project. It will take about a day and a half to finish, so make sure you have time. If you decide to not include the glitter than it will only take an hour or so to finish, and 30 minutes for the ribbon and rhinestone to dry.


- Card stock paper. Whatever color you want to use...whether it's your favorite color, or your wedding colors. I used my wedding colors. I already had bought card stock a while ago. I found this pack of card stock at Michaels months before I actually thought of this project. I lucked out. Since I'm a teacher/student I always like to stock up on craft supplies, especially when it's on sale.
- Modpodge glue. Optional if you want to use glitter than you need Modpodge. I used the extreme glitter effect, but you can pick which ever glitter glue you want just make sure it conceals/finishes the project by making the glitter smooth and won't let the glitter fall off. BIG Deal because I hate glitter cards that leave my hands filled with glitter. I bought this glue because I will be using it for other projects that deals with my wedding...just to justify the cost...lol
- Paint brush for spreading the glue. Again, this is optional if your not using glitter, just skip.
- Glitter. This is optional, if you don't want to use glitter than skip the glue and glitter all together. I love glitter, so I will be using glitter in this HOW TO...You can pick whatever color you want. The color I used is Champagne, which is one of my wedding colors.
- Ribbon. Whatever color you desire. I used a medium sized ribbon. I found my ribbon for $1 at Michaels.
- Rhinestones. You can use cheap rhinestones, or buttons, or whatever floats your boat. I was going to use Swarovski crystal rhinestones, but they weren't on sale when I went to Michaels :( So I got the cheaper alternative but they are very pretty and aren't as cheap as the others I saw. The brand I'm using is Crystazzi.
- Glue Gun/Fabric glue/Tacky glue. You need some kind of super glue, to glue on the rhinestones to the ribbon. Whatever you have in your house that sticks well you can use. I don't recommend super glue or elmers glue. They will not work for this project. I'm using a fabric tacky glue. I have a glue gun, but I need to buy the refills. So I'm using what I have on hand, so this projects stays cheap!
- Scissors.
- Paper
- Printer
- Computer
- Pen/Marker
- All of the following are givens right...lol
Second, I went on the internet searching for poems, sayings, anything that had to deal with friends, weddings and bridesmaids. I found a few poems, and card words for this project. I ended up combining a poem, and card words together to make one beautiful poem/inspirational card words. I can't remember where I found the two different poems, and card sayings, so I'm sorry :( But I can include a free printable of what I put together.
Here is the link to words: Will you be my Bridesmaid words?
Next I went searching for dress templates for my card. I found a few I liked. I think this part is a preference thing, because we all have different taste in dresses, so you can either use the three I have to share here or you can search for something different on your own.
1. Slimmer dress.
2. Big shirt.
I found these two templates, and I liked them both. The problem was that I liked the top of the first one, and the shirt on the second one. lol I know I'm complicated but I like what I like. So what I did...I printed them both off. Cut them out. I basically folded the big shirt top and taped it to the slimmer dress, and got this. (Below)
Once I got my dress template together I traced in on a piece of card stock (use a color you most likely won't use.) Then I cut it out.
Next I used the "trial and error" phrase...lol I printed off the poem on my word on a normal piece of paper. I traced the dress first and printed the poem. I did this, so I could center the words properly when I was ready to print the actual cards. The free printable bridesmaid words are centered for this card.
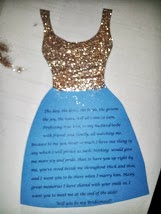
Now, it's time for the fun!! Now it's time to finally print your dress card on the color card stock you want! Yay! I basically took a normal card stock paper, and printed the centered words on the card stock. I didn't write anything on the card stock, and I didn't trace the dress yet.
Just a blank piece of card stock...print the words.
After I printed the words out, I then traced the dress around the words. This part is kind of crucial. Make sure you trace around the words correctly. Everything should be somewhat centered to the eye.
I did that step 4 times, I only have 3 bridesmaids, but I wanted the extra one in pink just in case I changed my mind about the MOH situation.
The next steps are for the glitter part. If your not using glitter, skip these steps until you get to the ribbon part. I recommend you use 2 pieces of scrap paper. You can use newspaper, or whatever else, but I find using 2 normal pieces of paper to be easier. Here is why: on one piece of paper you apply the glue to the card. You move the dress to the other piece of paper to apply the glitter. Once your done with the glitter you can save the rest of the glitter. If you apply glitter to the paper you applied the glue, the glitter will stick to the glue and paper, and you won't be able to save any extra glitter.
With a paint brush (make sure you wash after you use the brush) brush the glue on every corner you want the glitter to appear. I wanted mine on the top. Then apply the glitter.
Glue Then Glitter
Let the glitter dry. It will take about 30 minutes to 45 minutes to completely dry.
After the glitter has completely dried, apply glue on the top of the glitter, and reapply glitter. You don't necessarily have to do this step, but I did so that I could cover every empty spot. It'll take another 30 to 45 minutes to dry.
After the glitter, and glue has dried apply another layer of glue. This layer is to smooth everything out, and keep the glitter from falling off. This will take another 30 to 45 minutes to dry. If you want to apply another layer of glue you can, but remember it could start getting thick if you add a lot of layers.

Before we move on to the bow, we need to discuss one thing. When the cards are fully dry! They must be completely dry for this next step... (at least an hour or 2 just to be sure) the cards won't be flat, some might but they won't be flat like a real card. So What I did to get them flat was to put them under a stack of heavy textbooks (those things finally coming in handy! lol ). You could use anything that's heavy enough to flatten them out. I started my project in the morning around 10 am. As I moved around the house doing whatever it is I do. I kept coming back to the dresses to layer and glitter. By the end of the day around 7 pm I finally put these lovely dress cards under the textbooks to be flatten.
The next morning I checked to see if they were flattened enough, and they were!! So it probably won't take as long as I left them to flatten, but I did that as a precaution.
Now that our cards have been glitterfied, we will now add the ribbon!! Yay, this means we're about done.
I really recommend that you use a low temp glue gun. You can find them at Walmart for 3 bucks and it comes with refills already. Buying them from Michael's will be a rip off because they're about 4 bucks, with no refills. To buy the refills is another 4 bucks, and the pack is extra small. Stick to Walmart on this one...trust me!
(Note: Remember the reason why we're making our own cards...save money...keeping the cost low! Spending extra money would only make it costly, and not worth the trouble in the end. If you spend more than what you need then you might as well just buy them already made for you. The supplies I have listed have already been in my craft stock, so the cost was low.)
Wrap your ribbon around the waist of the dress before you cut the ribbon. Wrapping the ribbon around the waist first will tell you how much ribbon you will need. Once you've found the right size ribbon cut the ribbon, and begin gluing.
I started with gluing down the middle of the ribbon to the back of the card. Once, I finished gluing down the ribbon I set it to dry, and started on the other dresses. Following the same steps.
As my dresses and ribbons are drying, I started crafting bows. This part is a little hard to explain, but I'll try my best. When I make a bow with ribbon, (NEVER cut the ribbon and then make the bow. ) I make 2 bunny ears (the same way we teach our kids to tie their shoes.). I put one of the bunny ears in the loop and tighten it up. It should look like the bow below.
The size of the bow is up to you, it's a preference thing.
Next step...I forgot to take the pic :( but I guess just imagine it...lol Once the ribbon dries on your dresses, you can now glue the bow! Yay. The dress and ribbon took about an hour to dry...but they weren't completely dry. Just dry enough to glue the bows. You can pick which ever side you want to glue your bows. Again, it's a preference thing.
Last step...After I let the bows somewhat dry, I glued on my rhinestones in the middle of the bow!
Again, I recommend using a low temp glue gun. High temp should be fine too, just use as little as you can so theirs not dried up glue left. You could also use rhinestone glue if you have it. I had rhinestone glue, so that's what I used. (I have a big stock of craft supplies...being a preschool teacher for years, and now getting my Elementary Education degree. I wanted to be an Art teacher, but living in Florida and the budget cuts... it didn't make sense :( One day!
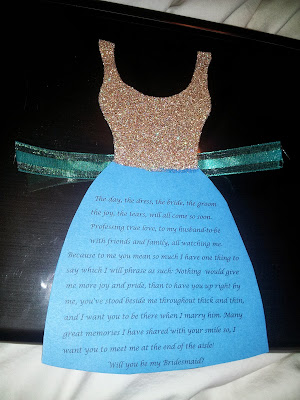
Here is the finished product!! This project is time consuming, but if you have the DIY touch and patience, it's all worth it in the end. I will be so happy to hand these cards to my bridesmaids!! Let me know what you think, I would love to hear your feedback!


.jpg)


You need to be a member of BridalTweet Wedding Forum & Vendor Directory to add comments!
Join BridalTweet Wedding Forum & Vendor Directory